What Happens During an Aircond Chemical Wash? Step-by-Step Guide
Ever wondered what happens during an aircond chemical wash? Our senior technician walks you through every step of the professional cleaning process.

A Behind-the-Scenes Look at the Chemical Wash Process
You might have noticed your electricity bill creeping up despite using the aircond for the same amount of hours.
Most homeowners in Petaling Jaya know that a chemical wash is the solution, but the actual process often remains a mystery.
It is easy to assume all services are the same until you see the difference in results.
We have performed thousands of chemical washes across the Klang Valley as a senior team at PJ Kool Aircond Service.
This experience allows us to walk you through exactly what happens during the procedure and why specific steps are non-negotiable.
You need to know what separates a professional restoration from a rushed job that could damage your unit.
Let’s break down the data, the exact steps we take, and how to spot a quality service provider.
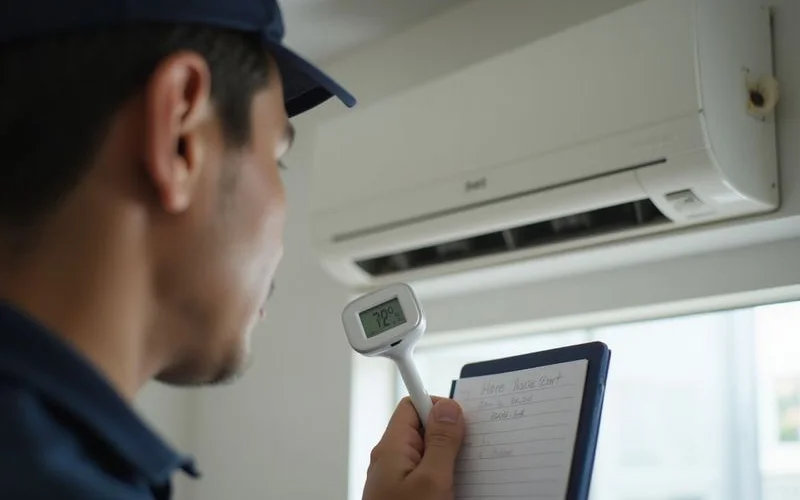
Step 1: Initial Inspection and Assessment
We never touch a tool until we understand the current health of your unit.
This initial diagnostic is the only way to establish a baseline for performance.
Our technicians focus on specific metrics to ensure a chemical wash is actually what you need:
- Measuring the Temperature Differential (Delta T): We use a digital thermometer to measure the difference between the air intake (room temp) and the air outlet (cool air). A healthy unit should show a drop of 8°C to 12°C. Anything less than 8°C often points to a gas leak or severe blockage.
- Auditory Check: We listen for rattling from the blower or the distinct “hissing” sound that indicates a refrigerant leak.
- Visual Mold Inspection: Using a torch, we check the blower wheel for black spots. If you see spots on the vents, the interior is likely covered in significant mould growth.
- Remote Functionality: We verify that the swing motors and mode selection respond correctly.
This assessment takes about 5 minutes but saves you money in the long run.
Identifying a faulty compressor or a gas leak early prevents you from paying for a cleaning service that won’t fix the underlying mechanical issue.
Step 2: Protecting Your Home
The chemicals used in this process are effective against grime but can be harsh on your flooring and furniture.
We take extensive precautions to ensure your home is left exactly as we found it.
Standard protection protocols include:
- Waterproof Canvas Hopper: We attach a specialized catchment bag around the unit that funnels water directly into a pail.
- Floor Protection: Plastic drop cloths are taped down to protect parquet or tile flooring from potential chemical splashes.
- Electronics Shielding: We cover nearby TVs or computers, as water mist can travel surprisingly far during the high-pressure rinse.
- Wall Towels: Absorbent towels are placed along the wall gap to prevent water streaks on your paint or wallpaper.
Skipping these steps is a major red flag.
A service provider who rushes straight to the washing stage puts your property at risk of water damage.
Step 3: Dismantling the Indoor Unit
Deep cleaning requires access to the internal components that a standard service cannot reach.
We carefully dismantle the cosmetic and functional layers of the wall-mounted unit.
This phase involves removing:
- The Front Fascia: The main plastic cover is unclipped and removed for separate washing.
- The Swing Vanes: These delicate plastic flaps control airflow direction and require gentle handling to prevent snapping the clips.
- The Filters: Standard mesh filters are removed for high-pressure cleaning.
- The Blower Assembly (Model Dependent): On certain designs, we detach the blower fan to access the back of the drainage tray.
Plastic becomes brittle over time in the Malaysian heat.
Our technicians are trained to handle older units, specifically aged Daikin and Panasonic models where the locking clips are known to be fragile.
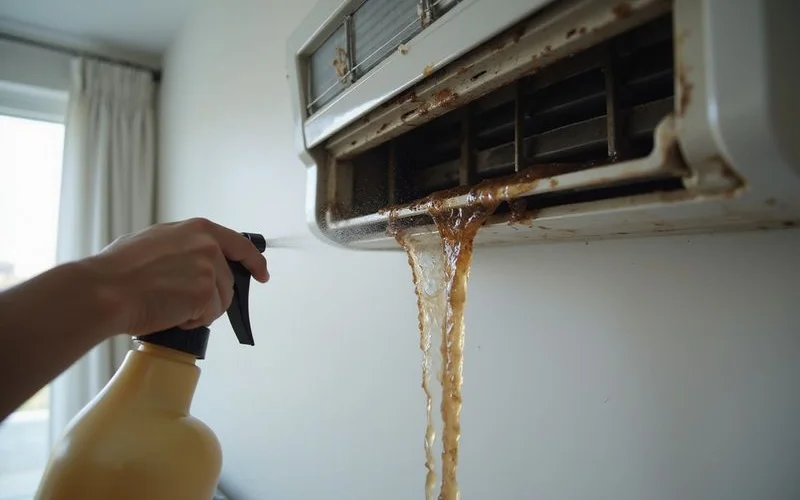
Step 4: Chemical Cleaning of the Evaporator Coil
This is the core of the service where the actual restoration happens.
We apply a professional-grade alkaline coil cleaner (typically pH 8-10) directly onto the aluminium fins.
Acid-based cleaners are avoided as they can corrode the metal and cause gas leaks over time.
Why The Chemical Matters
Water alone cannot remove the biological buildup inside an aircond. The chemical solution is formulated to:
- Dissolve Biofilm: It breaks down the “jelly” formed by algae and bacteria that bonds to the metal.
- Penetrate Tight Spaces: The foam expands between the tight aluminium fins where a brush cannot reach.
- Eliminate Odours: It neutralizes the bacteria causing that sour, vinegar-like smell common in PJ homes.
We allow the solution to dwell for 15 to 20 minutes for maximum effectiveness.
This dwell time is critical for the chemical to lift the oxidation and grime fully.
Once the reaction is complete, we use a pressurized water gun to flush the coil from top to bottom.
The runoff water is often black and sludge-like, containing years of trapped dust and dead skin cells.
Step 5: Cleaning the Drainage System
Water leaks are the most common complaint we receive from homeowners in Kuala Lumpur.
A clogged drain pipe is responsible for 90% of these indoor leaks.
We perform a three-step purge on the drainage system:
- Chemical Flush: The same cleaning solution is poured into the drain pan to break up algae “jelly.”
- Pressurized Clearing: We use a high-pressure water jet or a specialized vacuum to force any solid blockages out through the discharge pipe.
- Flow Test: We pour 1-2 litres of water into the tray to ensure it flows out rapidly without backing up.
Clearing the pipe prevents water from overflowing and damaging your walls or flooring in the weeks following the service.
Standard drain pipes are often only 16mm in diameter, making them very easy to clog without this deep clean.
Step 6: Cleaning the Blower Fan and Filters
The blower fan (or squirrel cage) is the cylinder that spins to push air into your room.
Dust accumulation here creates an unbalanced fan, leading to noise and reduced airflow.
We treat the blower fan with a high focus on balance and hygiene:
- Blade-by-Blade Scrub: The chemical is applied to the fan blades and scrubbed to remove the caked-on dust layer.
- High-Pressure Rinse: We blast the debris off the curved blades to restore their aerodynamic shape.
- Antifungal Treatment: The filters are soaked to kill spores before they are reinstalled.
A clean blower fan can increase airflow velocity by up to 40%.
You will notice the air reaches the far side of the room much faster after this step.
Step 7: Reassembly and Performance Comparison
The unit is carefully put back together once all parts are dry.
We follow a strict reassembly protocol to ensure no rattles or loose parts remain.
The Post-Service Check
Reassembling the unit is not the final step. We must verify the improvement with hard data.
| Checkpoint | Pre-Service Status | Post-Chemical Wash Goal |
|---|---|---|
| Airflow Strength | Weak / Uneven | Strong / Consistent |
| Odour | Musty / Sour | Neutral / Fresh |
| Cooling Speed | Slow (over 20 mins) | Rapid (under 10 mins) |
| Delta T (Temp Drop) | under 8°C | 10°C - 14°C |
Our technicians take a final temperature reading to show you the tangible improvement.
Seeing a 12°C drop in output temperature confirms the efficiency has been restored.
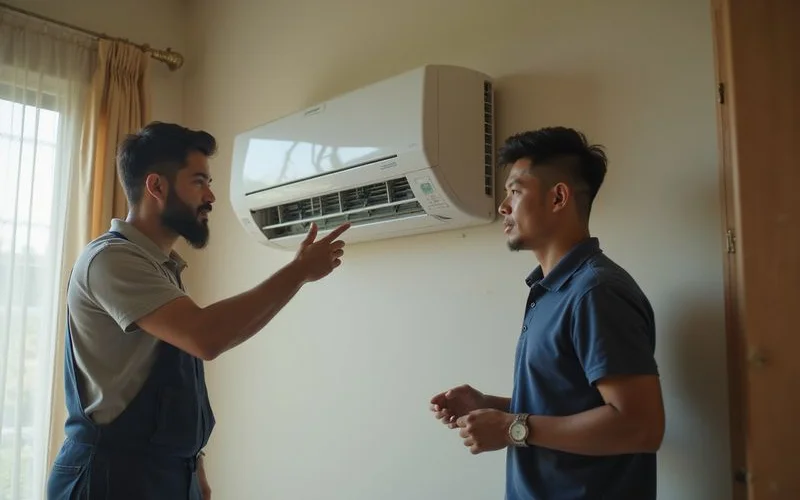
Step 8: Final Report and Education
We provide a transparent summary of what we found inside your unit.
This is your opportunity to ask questions and understand the health of your cooling system.
The handover process includes:
- Visual Evidence: We show you photos of the dirty water and the clean coil.
- Maintenance Schedule: Based on your usage (e.g., 8 hours vs. 12 hours a day), we recommend the next service date.
- Gas Pressure Check: While a chemical wash cleans the unit, we also check the gas pressure (R32 or R410A) to ensure it is within the manufacturer’s range of 120-150 psi.
PJ Kool Aircond Service prioritizes education over sales.
We will tell you honestly if your unit is nearing the end of its lifespan rather than charging you for repairs that won’t last.
How Long Does the Process Take?
Quality takes time, but it shouldn’t take all day.
A standard wall-mounted unit chemical wash takes 45 to 60 minutes per unit.
This timeline allows for the proper 15-minute chemical soaking period which many rushed technicians skip.
Ceiling cassette units require more disassembly and typically take 60 to 90 minutes.
Be wary of anyone claiming they can finish a chemical wash in 20 minutes.
It is physically impossible to protect, dismantle, chemically soak, rinse, and reassemble a unit correctly in that timeframe.
Ready to Restore Your Cooling?
You don’t have to tolerate weak airflow or high electricity bills.
Homeowners in Petaling Jaya, Kelana Jaya, Bandar Utama, and the Klang Valley can rely on us for a thorough restoration of their air conditioning units.
Contact PJ Kool Aircond Service today to book a slot.
We treat your home with respect and your aircond with the expertise it deserves.